2. Manage Database Replication
Databases can be replicated
between Mailbox servers in the same DAG. Managing these database
replicas is a straightforward process. The information covered in this
section will help ensure that your database copies remain healthy.
2.1. Manually Seed a Database Copy
Seeding the database is the act
of performing the initial database copy to the target replicas. Once the
database copy exists on the replica, it is kept up-to-date with the
transaction logs as they are replicated over. Database seeding can take a
long time to complete, particularly if you take advantage of the larger
database size recommendations with Exchange Server 2010. Therefore, you
may decide to seed the replica in advance of creating the database copy
or afterward during non-peak hours. There are multiple ways you can
manually seed a database copy.
2.1.1. Manual Seeding Through Exchange
When you manually seed the
database inside Exchange, the database copy is being done with Exchange
resources. If the database is already replicating to the target
location, replication needs to be suspended. For steps on suspending
database replication, see the section, "Pause Database Replication."
If there is an existing database file on the replica, you will need to
delete it manually or configure the database to be overwritten during
the reseed.
One of the advantages of
manually seeding the database is that you can choose which copy of the
database provides the source replica. By default, when automatic
database seeding occurs the active copy of the database is the source
replica. However, Exchange Server 2010 allows you to choose which
replica you want to use, even if it's a passive copy of the database.
|
After you have started seeding a database copy, don't close the EMC or the EMS! If you do, the seeding stops along with it.
|
|
You can reseed the database copy with the Update-MailboxDatabaseCopy cmdlet. The parameters that can be used with this command are laid out in Table 2.
Table 2. Parameters for Reseeding a Database in the EMS
| Parameter | Description |
|---|
| DeleteExistingFiles | If set to $True, any existing database files will be removed before reseeding. |
| ManualResume | If set to $True, replication does not automatically resume after seeding is finished. |
| SourceServer | The name of the Mailbox server that you want to be used as the source replica for the reseed. |
The following example deletes
the existing files and uses a passive copy of the database for seeding.
Before running this command, replication must be suspended:
Update-MailboxDatabaseCopy DB1\CONTOSO-MB03 -SourceServer
CONTOSO-MB02 -DeleteExistingFiles:$True
2.1.2. Manual Seeding by Copying the File
In addition to seeding
through Exchange, you have the ability to seed the database by hand by
simply copying the database to the target replica. To perform this
process, you have to dismount the database, which means that the
database will be taken offline during the copy.
You can use any method you
wish to get the database copy over to the target replica. If you are
going to be copying the database to the target replica through a file
share, I recommend that you use robocopy.exe instead of just performing a drag-and-drop in Windows Explorer.
You can use the following steps to seed the database by hand:
Suspend the database copy if it is already replicating. See the next section, "Pause Database Replication," for steps on how to do this.
Dismount the active copy of the database.
On the server that you are reseeding the database to, log in and delete the database file and the log files on the server.
Copy the database file from the source server to the target server that hosts the passive copy.
Mount the Mailbox database on the source copy.
Resume replication of the database.
2.2. Pause Database Replication
At any time, you may
want to temporarily stop the replication of a database copy. Suspending
replication is required if you want to perform a reseed, and it's a
recommended practice before performing other database maintenance
activities, such as moving the location of database files. The following
order is usually followed:
Stop database replication.
Perform maintenance on database.
Resume database replication.
2.2.1. Stop Database Replication
You can stop database replication in the EMC using the following steps:
Open the EMC and browse to the Organization Configuration => Mailbox node in the Console tree.
Click the Database Management tab in the Work area. Select the database that you want to stop replication for.
In
the list of database copies in the bottom pane of the Work area, select
the database copy that you want to stop replication to.
In the Action menu for the database copy that you selected, click the Suspend Database Copy option, as shown in Figure 9.
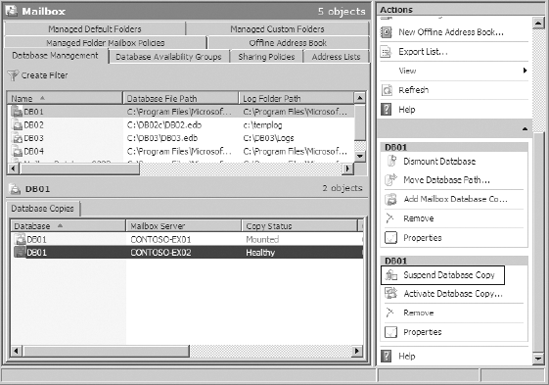
The
Administrative Suspend dialog box will appear, asking you if you are
sure that you want to continue. You can optionally type in a reason for
why you are suspending the copy in the Comment box in the dialog box.
You may want to enter a comment here in case another administrator
notices that replication is suspended and tries to resume it. When the
other administrator attempts to resume replication, they will be
presented with the comment that you made in the confirmation dialog box
and given the option of not continuing. When you are ready to stop the
copy, click the Yes button.
You can also use the Suspend-MailboxDatabaseCopy cmdlet to stop database replication. The following example suspends the copying of the database DB1 to the server CONTOSO-MB03:
Suspend-MailboxDatabaseCopy DB1\CONTOSO-MB03
2.2.2. Resume Database Replication
After maintenance has been
performed on the Mailbox database, you can resume replication to the
target replica. To resume replication in the EMC, follow these steps:
Open the EMC and browse to the Organization Configuration => Mailbox node in the Console tree.
Click
the Database Management tab in the Work area. From the list of
databases, select the database that you want to resume replication for.
The
list of database copies is propagated in the bottom pane of the Work
area. Find the database copy that you want to resume replication for.
The Copy Status should read Suspended. Select this database copy.
From the Action menu of the database copy, select the Resume Database Copy option, as shown in Figure 10.
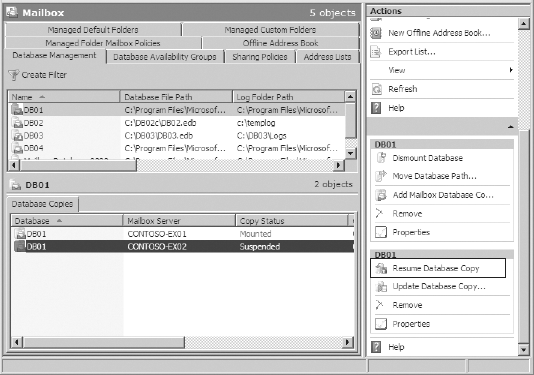
The
Administrative Resume dialog box will appear, asking you if you are
sure that you want to continue. This dialog box also displays the
comment that the person who suspended the database copy typed in. If you
want to continue, click the Yes button to resume replication.
The Resume-MailboxDatabaseCopy
cmdlet in the EMS can also be used to resume database replication. The
following example resumes replication of the database copy that we
previously stopped:
Resume-MailboxDatabaseCopy DB1\CONTOSO-MB03
2.3. Modify the Replication Settings of a Database
There are some settings
associated with a database copy that affect how the database handles
logs and failover. For handling transaction logs, you should be aware of
two primary settings:
Replay Lag Time
This setting determines
how many minutes must pass before the replicated log is replayed into
the passive copy of the database. This is disabled by default, but you
can enable it if you are concerned about replaying a corrupted log into
your database copy.
Truncation Lag Time
This setting specifies how
many minutes to wait before deleting the transaction logs. The
countdown of the truncation lag time starts after the transaction log
has successfully replayed into the database.
You can also use the EMS to configure these setting by specifying the correct parameter on the Set-MailboxDatabaseCopy cmdlet. Table 3 displays these parameters and their options.
Table 3. EMS Parameters for Database Copy Settings
| Parameter | Description | Possible Values |
|---|
| ReplayLagTime | The amount of time that passes before logs are replayed into the passive copy of the database. | A time-based value of up to 14 days in the format of Days.Hours:Minutes:Seconds. For example, 1 day would be 1.0:0:0. |
| TruncationLagTime | The amount of time that must pass before a log file can be deleted on a database copy. | A
time-based value of up to 14 days. This value should be in the format
of Days.Hours:Minutes:Seconds. For example, 12 hours and 34 minutes
would be 0.12:34:00. |
The following example adjusts the replay lag time of a database copy to 1 day and sets the truncation lag time to 1 week:
Set-MailboxDatabaseCopy DB1\CONTOSO-MB03
-ReplayLagTime 1.0:0:0
-TruncationLagTime 7.0:0:0
2.4. View the Current Status of Replication
If you want to retrieve statistics on your database copies, you can use the Get-MailboxDatabaseCopyStatus
cmdlet. This cmdlet will present information about your database copies
that you can use to determine what state they are in and what the
overall health is.
When you run this command from the EMS, the following types of status information is gathered:
The health of the copy status
The name of the server that holds the active database copy
The number of logs in the replay queue
The last time backups were completed against the database
The following command will display the status of a database copy and all the information available in a list:
Get-MailboxDatabaseCopyStatus DB01\CONTOSO-MB02 | fl
You can also gather
information about multiple database copies. The following command will
display the database, the name of the active server, and the health of
the database copies in a table:
Get-MailboxDatabase | Get-MailboxDatabaseCopyStatus | ft
Name, Status, ActiveDatabaseCopy